Is the Easy Reacher worth it?
Casimir Covert-KeefeTo answer questions about our Underseat Racks, we're using an article from BROL:
TerraCycle Easy Reacher Underseat Rack
By JOSE A. HERNANDEZ
BROL Staff Writer and Co-Founder
A true adventure, the kind that challenges you to rely on your own power to reach your destination AND count on your own resources for survival, may just be a self-contained tour away. These unsupported tours can stir up a delicious sense of excitement that’s intermingled with an enigmatic sense of freedom and fulfillment. But much of your joyous success will depend on your ability to conveniently and safely haul the “bare essentials”.
If you’re a beginner, you’ll need to carry food, fluids, clothes, sun screen, rain gear, tools, a lighting system, extra batteries, a few spare bike parts, spare tubes, tube repair kit, air pump or CO2 inflator, sleeping bags, tent, and let’s not forget, a digital camera. Of course, if you qualify as an “experienced” or “hardcore” explorer, your checklist will also have to include a global positioning device, a two-way radio, a lap top computer, a miniature television set and a waterproof envelope for your hotel reservations! Regardless of your experience rank, you’ll have to find a way to haul your “bare essentials”. This means fitting your favorite bike with pannier racks (and a good set of panniers), a trailer or both. A trailer is arguably a good way to drag lots of stuff but, for most 1-2 day escapades, I think that panniers are probably the more practical way to go.
Panniers can be hung on a conventional bike rack, but doing so on a recumbent bike (especially a CLWB or LWB) could result in less than optimal weight distribution and compromised handling. Many experienced folks have found that the best place for a recumbent bike pannier is right under the bike’s seat but few manufacturers offer underseat racks for their bikes. Pat Franz of T-Cycle.com fame stumbled into this need a couple of years ago: “I got into the rack business because Laurie Smith at the ERRC talked me into it. A club member had made an underseat rack for his Tour Easy, and there were a lot of other club members who were interested in something like it. Laurie wanted to know if I was interested in making things like racks, and put together an order for 50 racks. The 50 turned to 60, then 75, and was for over 100 racks by the time the first production run was complete a couple months later. All of a sudden I was in the rack business, and I started looking around for where else underseat racks were needed.”
Of course, when Laurie Smith asked Pat to make those racks, she could not have picked a better man for the job. Armed with an engineering and hardware/software design background, Pat came into our recumbent world in the mid 90’s after feeling “burned out in the high-tech scene”. His motive was pure and simple: “I wanted to make things where people cared how well they worked, unlike the computer biz, where schedule and cost are all that truly matter anymore. My goal is to make parts that solve real world problems, are a joy to use, and last for years and years. While cost is important, I don’t let it drive the design. How things work is much more important to me.” And “make things” he has most certainly done! In 98-99 he designed and built the Terra-Za, a superbly refined short long wheel base bike and, a couple of years ago, the folks at Bacchetta Bikes adopted his excellent Glide Flex system as standard equipment for many of their recumbent models. Other manufacturers have since followed suit. The list of “things” being built has grown to include, handlebars, idlers, stems, seat parts, tail socks and, very recently, under seat pannier racks for numerous recumbent bicycles.
A few days before I submitted my recent review of the Jett Creek bike, Pat asked if we might be interested in reviewing the Easy Reacher pannier racks which he had specifically designed for this bike. Within a few more days, a neatly packaged bag containing the Teracycle’ racks and detailed installation instructions arrived at my front door.
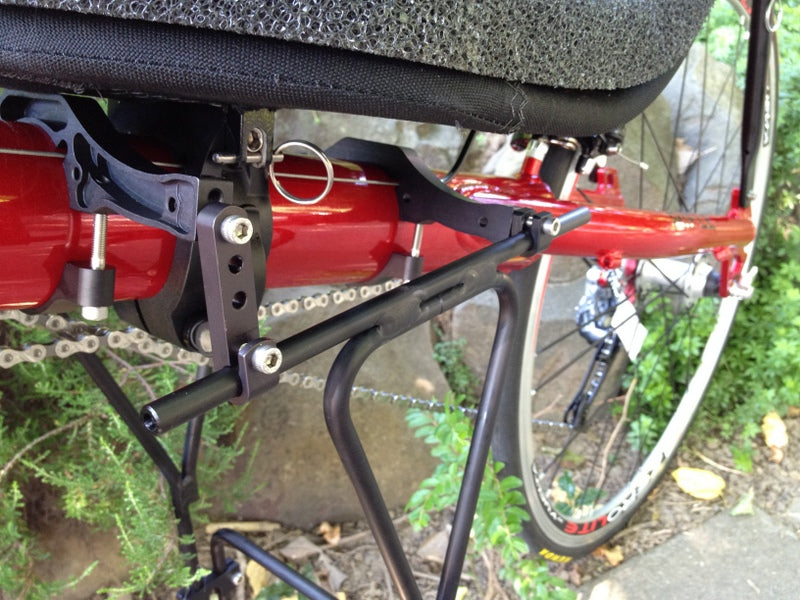
The Making of the Rack
The Burley racks basically consist of two side rails held together with a lower crossbar, two upper crossbars which slide over each side of the seat’s adjustment rail and a couple of clips and clamps. On the surface, the design of these racks appear to be so surprisingly simple that various forms of “Damn it, why didn’t I think of that?” might tempt you into thinking you can build one yourself. But underneath its “simple” appearance, lies a well thought-out design, special purpose jigs for bending and welding the side rails and the precision that is only possible with a CNC machine. A CNC machine (Computer Numeric Control), in case you’re wondering, is a computer driven metal sculptor that, in the right hands, can carve complex metal shapes with super human precision. Pat uses his two CNC machines to shape the racks cross arms, pannier clips, and clamps and welds the 6061 aluminum side rails in front and back for added strength.
The Burley rack will not fit other bikes but Pat Franz is currently making racks for a number of other popular bikes like the [Bacchetta, Barcroft, Challenge, Easy Racers, Haluzak, Rans, and Volae]. Bryan Ball also tested the Easy Racers version for this article. His comments are at the end.
Rack Installation & Torture Test
Ease of installation is one of the rack’s best features. The racks come with easy to follow instructions and the whole installation process is idiot proof, as evidenced by my being able to set them up in a matter of minutes. All you basically have to do is slide the crossbars over the seat’s rail, hang the side rails, attach the lower crossbar, align & tighten everything with a 4 mm Allen wrench, hang your favorite panniers on the rails and off you go. There should not be any chain interference as the lower crossbar can be easily adjusted to clear the chain path. Once we did this, we were ready to stuff waterproof Orlieb panniers with a few articles of clothing, a sleeping bag, a pillow, tools, four water bottles, an air pump, a bunch of tools and to make sure we stressed the racks, we went ahead and threw in two 20-pound dumbbells in preparation for our “torture test”.
My very first test ride resulted in the following observations:
The overstuffed panniers did not in any way interfere with pedaling or planting my feet firmly on the ground.
I did not have to get off the bike in order to grab something out of the panniers. Just about everything, with the exception of the items on the very bottom of the pannier were within my reach.
Though the heavily loaded Jett Creek was hard to lift, it rolled as if I was not hauling a 45 – 50 pound load. Once you get moving, you just forget the panniers are right under you.
The next test rides were intended to see just how the bike handled with a heavy load under its seat and also to determine just how durable and reliable these racks might be. Our relatively smooth South Florida roads did not seem to qualify for my “torture test”. I needed a more challenging surface. Hence, I chose to ride on sidewalks (sometimes jumping the curbs), nearby bike paths and, to really shake the hell out of these racks and to really see how the bike handled under the most bizarre conditions I could imagine, I included a few rides through Markham Park’s mountain bike trail. During these rides, I purposely aimed to hit just about every obstacle and pothole in my way. The good handling qualities afforded by the Jett Creek’s low BB and its flexible frame in combination with the excellent under the seat location of my “cargo”, made it possible for me to finish my tests without crashing. Throughout all of this the bike handled quite well. I was one with my cargo – almost as if I were not hauling a heavy load under my seat. During a couple of ridiculously sharp turns I did manage to lean the bike a bit too much and the bottom of the pannier bags rubbed briefly against the ground, slightly scratching the bottom of the pannier bags but the racks themselves were oblivious to the punishment. The racks easily and securely supported the loaded panniers while the clips and clamps stayed tightly in place. Post ride adjustments were simply not necessary.
Based on my test rides I would have to conclude that the TerraCycle’s Easy Reach Racks have what it takes to take on the rigors of the real world. These racks are beautifully machined, easy to install, virtually indestructible and safe to ride with.
Bryan’s Notes – I can’t agree more with Jose’s comments. I’ve been using a set of these racks on my trusty Easy Racers Fold-Rush and have been thoroughly impressed. The finish level on these racks is without equal. They also fit the bike more perfectly then I ever expected. Pat does not just make one rack and then adapt it to fit various bikes. Each rack is a complete clean-sheet design. My Easy Racers rack even had a small hole in it one of the clips for the rear brake cable to pass through. While I did not stress my rack to the ridiculous standard that Jose did, I can say without a doubt that it is a very sturdy piece. There was no additional chain rattle or squeaking. It was quite easy to forget that I even had panniers on the bike at all. The only minor drawback I had was that it was a bit difficult to mount and remove my Ortlieb panniers since the top rail is so close to the seat base. Other bikes may not have this issue. If you are planning on using panniers extensively for touring or commuting and TerraCycle makes a rack for bike… Buy one.